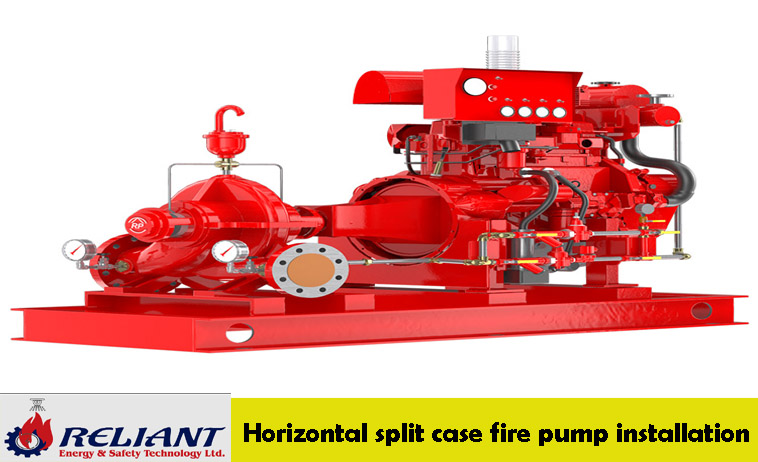
Horizontal split-case fire pumps are a cornerstone of fire protection systems, ensuring a reliable water supply to combat fires effectively. These pumps are particularly valued in buildings and industrial facilities for their robust construction, efficiency, and ability to handle high-capacity water flow.
Proper installation and maintenance of horizontal split-case fire pumps are critical to ensuring long-term performance and compliance with fire safety standards. Installation begins with selecting a suitable location that minimizes vibration and provides easy maintenance access. Precise alignment of the pump and driver is essential to prevent wear and operational issues. Connecting the pump to a secure water source and testing for leaks during initial operation are crucial steps.
Maintenance involves routine inspection of components, including bearings, seals, and impellers, to identify wear or damage. Regular lubrication, alignment checks, and performance testing are necessary to ensure optimal functionality. Adhering to manufacturer guidelines and industry standards can help prolong the pump’s lifespan and enhance system reliability.
Whether you are an installer, facility manager, or fire safety engineer, following these 2024 installation and maintenance instructions will help you maximize the efficiency and dependability of horizontal split-case fire pumps.
What is a Horizontal Split Case Fire Pump?
A horizontal split case fire pump is a centrifugal pump typically used in fire protection systems. The design consists of a horizontal casing that can be split in half for easy access to the internal components, such as the impeller, shaft, and bearings. This pump type is known for its durability, low maintenance requirements, and efficient water delivery. They are used in large-scale fire suppression systems like commercial buildings, factories, and industrial facilities.
Key Features:
- Split Case Design: Allows easy access to the pump’s internal parts for maintenance and repair.
- Horizontal Orientation: Saves space in installations compared to vertical pumps.
- High-Flow Capacity: Designed for large-scale fire protection systems requiring significant water flow.
- Durability: Constructed from high-quality materials like cast iron, ensuring longevity even in demanding environments.
Importance of Correct Installation
Proper installation of a horizontal split case fire pump is crucial for the following reasons:
- Ensuring Reliability: A well-installed fire pump ensures uninterrupted water flow during a fire.
- Compliance with Standards: Incorrect installation may violate fire protection codes and standards, leading to costly fines or insurance issues.
- Optimized Performance: Proper installation ensures the pump operates efficiently, saving energy and extending its lifespan.
- Safety: Correct installation prevents malfunctioning, leaks, or mechanical failures that could compromise fire safety.
Pre-Installation Preparations
Several factors need to be considered before you begin the installation process. Proper preparation ensures a smoother installation and reduces the likelihood of complications.
- Site Assessment
- Location Selection: Choose a dry, easily accessible location with sufficient space for the pump, associated piping, and other equipment. Consider vibration isolation and accessibility for maintenance.
- Foundation: The pump should be installed on a solid foundation or a reinforced concrete slab. The foundation must be level and debris-free to ensure the pump’s stability and proper alignment.
- Pump and System Compatibility
- Ensure the horizontal split case fire pump is compatible with the fire protection system’s water supply, pressure requirements, and flow rates.
- Verify that all accessories, such as the jockey pump, valves, and controllers, match the specifications of the fire pump system.
- Required Tools and Equipment
- Torque wrench, lifting equipment (crane or hoist), level, alignment tools, sealing gaskets, and bolting materials are essential for installation.
- Ensure all electrical connections, including the motor, are adequately insulated by local electrical codes.
Step-by-Step Installation Process
Step 1: Unboxing and Inspection
- Upon delivery, inspect the pump and all associated components for shipping damage.
- Verify that all parts are included and that the pump model matches the specifications.
Step 2: Prepare the Pump Foundation
- The foundation should be level and capable of supporting the weight of the pump and motor. Use a laser level to ensure the foundation is precisely level.
- Install anchor bolts on the foundation to secure the pump base.
Step 3: Lifting and Positioning the Pump
- Using a crane or hoist, lift the pump and carefully position it on the foundation.
- Ensure the horizontal split case fire pump is aligned correctly with the suction and discharge piping locations.
- Avoid applying direct lifting force to the pump casing; always lift using the designated lifting points.
Step 4: Mount the Pump and Motor
- Attach the pump to the motor using the coupling. Ensure the coupling is aligned to avoid wear and vibration issues.
- Tighten the mounting bolts to secure the pump and motor in place. The pump and motor must be perfectly aligned to minimize vibration and ensure optimal operation.
Step 5: Connecting the Suction and Discharge Piping
- Suction Line: Connect the suction piping from the water source to the pump’s inlet. Ensure the suction pipe is free of debris and contaminants, which could damage the impeller and affect performance.
- Discharge Line: Connect the discharge piping to the pump outlet. The discharge pipe should be adequately supported to prevent movement and vibration.
- Use flexible couplings or gaskets to ensure leak-free connections.
Step 6: Install the Jockey Pump (if applicable)
- A jockey pump is often installed alongside the main fire pump to maintain system pressure when no fire is present. It ensures the system is always pressurized and ready to operate.
- Install the jockey pump according to the manufacturer’s instructions and connect it to the same piping system as the primary pump.
Step 7: Electrical Connections
- Connect the pump motor to the electrical panel, following all safety standards and local electrical codes.
- Ensure proper grounding of the motor and pump to prevent electrical hazards.
- Verify the pump’s control panel, including the fire alarm trigger and other safety systems, is wired correctly.
Step 8: Pressure Relief Valve Installation
- Install the pressure relief valve to prevent system overpressure. This safety mechanism ensures the pump operates within its rated pressure limits.
Step 9: Check Valve Installation
- Install check valves on both the suction and discharge sides of the pump. These valves prevent backflow and ensure the pump operates efficiently.
Post-Installation Checks
Once the pump is installed, several checks are necessary before commissioning the system:
- Alignment Check
Check the alignment of the pump and motor using a laser alignment tool or a straight edge. Misalignment can cause excessive wear on bearings and couplings.
- Lubrication
Check the lubrication levels in the bearings and any other moving parts. Refer to the manufacturer’s specifications for the type and quantity of lubrication needed.
- Priming
If the system requires priming, ensure the pump is primed correctly to avoid cavitation, which can damage the impeller and other components.
- System Pressure Check
Conduct a pressure test on the system to ensure the pump and associated piping can handle the required pressure without leaks.
- Control Panel Test
Test the fire pump control panel to verify proper operation. Ensure the pressure sensors, alarms, and other components function as intended.
Testing and Commissioning
After completing the installation and initial checks, it is time for testing and commissioning:
- Initial Startup: Start the pump and observe its operation. Look for any unusual noises, vibrations, or leaks.
- Flow and Pressure Test: Measure the flow and pressure delivered by the pump to ensure it meets the required specifications. This can be done using a flow meter and pressure gauge.
- Simulate Fire Conditions: Simulate a fire event by triggering the fire alarm system. Verify that the pump starts automatically and delivers water as expected.
- System Integration Test: Ensure the pump integrates seamlessly with the rest of the fire protection system, including the water tanks, sprinklers, and alarms.
Maintenance and Troubleshooting
Proper maintenance is essential to keep the horizontal split case fire pump in optimal working condition:
- Regular Inspections: Schedule monthly or quarterly inspections to check for leaks, unusual noises, or vibrations.
- Lubrication: Regularly check and replace lubricants in the bearings and seals.
- Test Operation: Run the pump periodically to ensure it is in working condition. This is particularly important in fire protection systems to ensure quick emergency readiness.
- Check for Blockages: Inspect the suction and discharge lines for any blockages that could hinder performance.
Conclusion
Installing and maintaining a horizontal split case fire pump is vital to the safety and efficiency of fire protection systems, particularly in large-scale commercial and industrial settings. These pumps deliver high-capacity water flow, ensuring reliable performance during emergencies. Proper installation begins with thorough site assessment and planning, including verifying pump compatibility with the piping system and infrastructure. The pump must be securely mounted and perfectly aligned to minimize vibrations and wear. Key components, such as pressure relief valves, check valves, and electrical connections, should be installed precisely to avoid malfunctions. Once the installation is complete, rigorous system testing under real-world conditions is essential to confirm optimal operation and identify any issues. Regular maintenance is equally critical to maximize the pump’s lifespan and ensure consistent performance. Routine inspections help detect leaks, unusual noises, or component wear, allowing for timely repairs. Bearings and other moving parts should be lubricated to prevent excessive friction and damage. Periodic system testing ensures the pump remains in top condition and is ready to perform in emergencies. Following these installation and maintenance guidelines, you can provide a reliable and compliant fire protection system, safeguarding lives and property while meeting fire safety regulations in 2024 and beyond.

